โซนซัพพลายและดีมานด์ (Supply & Demand Zones)Supply and Demand Zones
หาโซนที่ราคาออกตัวแรง วาดขอบโซนอย่างเป็นระบบ ให้คะแนนความแข็งแรง และวางออเดอร์รอพร้อม SL ที่มีเหตุผลFind the areas price left in a hurry, draw zone edges systematically, grade their strength and plan pending orders with logical stops.
ในบทความนี้ · 7
In this article · 7
โซนซัพพลายและดีมานด์ (Supply & Demand Zones) เป็นแนวคิดที่ต่อยอดจากแนวรับแนวต้าน แต่ให้ความสำคัญกับ "จุดที่ราคาเริ่มวิ่งแรง" มากกว่า "จุดที่ราคาเด้งหลายครั้ง" แนวคิดคือ ถ้าราคาออกตัวจากบริเวณหนึ่งอย่างรวดเร็ว แปลว่าตรงนั้นอาจมีคำสั่งซื้อหรือขายขนาดใหญ่ที่ยังไม่ถูกจับคู่หมด เมื่อราคากลับมาอีกครั้ง คำสั่งที่เหลือนั้นอาจทำให้ราคาตอบสนองอีก
ซัพพลายและดีมานด์คืออะไร
- โซนดีมานด์ (Demand Zone) บริเวณที่ราคาพักตัวสั้น ๆ แล้ววิ่งขึ้นแรง มองว่าเป็นที่ที่ผู้ซื้อมีมากกว่าผู้ขาย
- โซนซัพพลาย (Supply Zone) บริเวณที่ราคาพักตัวสั้น ๆ แล้วร่วงแรง มองว่าเป็นที่ที่ผู้ขายมีมากกว่า
รูปแบบที่มักพบมี 4 แบบ ตามทิศของราคาก่อนและหลังฐาน (Base)
| รูปแบบ | ก่อนฐาน | หลังฐาน | ประเภท |
|---|---|---|---|
| Rally-Base-Rally | ขึ้น | ขึ้น | ดีมานด์ (ต่อเทรนด์) |
| Drop-Base-Rally | ลง | ขึ้น | ดีมานด์ (กลับตัว) |
| Drop-Base-Drop | ลง | ลง | ซัพพลาย (ต่อเทรนด์) |
| Rally-Base-Drop | ขึ้น | ลง | ซัพพลาย (กลับตัว) |
"ฐาน" คือแท่งเทียนตัวเล็ก 1–4 แท่งที่ราคาหยุดคิดก่อนวิ่งออก
วาดโซนอย่างเป็นระบบ
- หาแท่งเทียนตัวยาว (แท่งออกตัว) ที่ทำให้ราคาวิ่งออกจากบริเวณหนึ่งชัดเจน
- ดูแท่งเล็กก่อนหน้า นั่นคือฐาน
- สำหรับดีมานด์ ขอบล่างของโซนคือจุดต่ำสุดของฐาน (รวมไส้) ขอบบนคือจุดสูงสุดของตัวเทียนในฐาน
- สำหรับซัพพลาย กลับด้าน ขอบบนคือจุดสูงสุดของฐาน ขอบล่างคือจุดต่ำสุดของตัวเทียนในฐาน
- ถ้าโซนกว้างเกินไปเมื่อเทียบกับระยะ SL ที่รับได้ ให้ข้ามไป หรือดูไทม์เฟรมเล็กเพื่อหาฐานที่แคบลง
ให้คะแนนความแข็งแรงของโซน
ไม่ใช่ทุกโซนที่น่าเทรด เกณฑ์ที่นิยมใช้คัดกรอง
- แรงออกตัว ยิ่งแท่งออกตัวยาวและเร็วเมื่อเทียบกับแท่งปกติ โซนยิ่งน่าสนใจ
- ความสด (Freshness) โซนที่ยังไม่ถูกกลับมาแตะเลยมีน้ำหนักมากกว่า โซนที่ถูกแตะ 2–3 ครั้งแล้วมักอ่อนลง
- ระยะทางที่ราคาไปได้ ถ้าออกจากโซนแล้วทำ BOS ได้ แปลว่าโซนนั้นสร้างการเปลี่ยนแปลงจริง
- สอดคล้องกับเทรนด์ใหญ่ โซนดีมานด์ในขาขึ้นบน H4 น่าเชื่อถือกว่าโซนดีมานด์ในขาลง
- เวลาที่อยู่ในฐาน ฐานสั้น (1–3 แท่ง) มักดีกว่าฐานที่แกว่งนานจนกลายเป็นกรอบ
โซนดีมานด์ที่อยู่ตรง HL ของขาขึ้น หรือโซนซัพพลายที่อยู่ตรง LH ของขาลง คือจุดที่หลายเหตุผลมาบรรจบกัน อ่านเพิ่มที่ โครงสร้างราคา
วิธีเข้าเทรด
มีสองแนวทางหลัก
- ออเดอร์รอที่ขอบโซน (Set and forget) ตั้ง Buy Limit ที่ขอบบนของดีมานด์ SL ใต้ขอบล่าง ข้อดีคือ RR ดีและไม่ต้องเฝ้าจอ ข้อเสียคือเข้าทุกครั้งที่ราคาแตะ แม้โซนกำลังจะพัง
- รอสัญญาณยืนยัน รอแท่งกลับตัวหรือโครงสร้างไทม์เฟรมเล็กเปลี่ยนในโซนก่อน ข้อดีคือคัดโซนที่พังออกได้บางส่วน ข้อเสียคือพลาดบางรอบที่ราคาแตะแล้ววิ่งเลย ดู สัญญาณเข้าเทรด
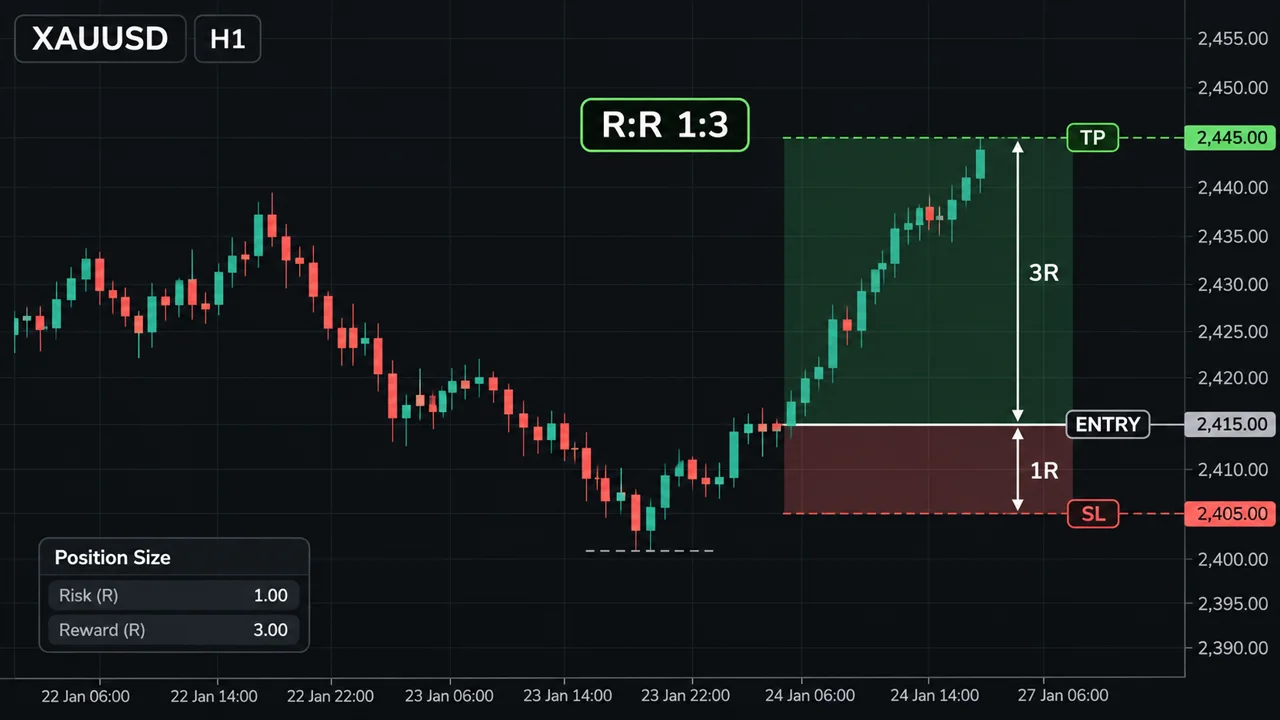
สมมติบน H4 มีโซนดีมานด์แบบ Drop-Base-Rally ช่วง 1.0750–1.0765 ราคาออกตัวขึ้นแรงจนทำ BOS บัญชี $5,000 ยอมเสียประมาณ 1% ตั้ง Buy Limit ที่ 1.0767 (เหนือขอบบนเล็กน้อยเผื่อสเปรด) SL ที่ 1.0743 (ใต้ขอบล่าง 7 pip) = 24 pip ใช้ 0.20 ล็อต = $2/pip → ความเสี่ยง 24 × $2 = $48 (0.96% ของบัญชี) TP แบบ 3R = 24 × 3 = 72 pip → 1.0767 + 0.0072 = 1.0839 → กำไรถ้าถึงเป้า 72 × $2 = $144 ก่อนตั้ง TP ให้เช็คว่ามีโซนซัพพลายขวางระหว่าง 1.0767 ถึง 1.0839 หรือไม่ ถ้ามี ควรลดเป้าลงมาก่อนถึงโซนนั้น
ดูภาพด้านล่าง ตัวอย่างนี้วาดเป็นกราฟ
จุดอ่อน / ข้อผิดพลาดที่พบบ่อย
- ทุกที่เป็นโซนได้ แทบทุกแท่งยาวมีฐานอยู่ข้างหน้า ถ้าไม่คัดกรอง คุณจะมีโซนเต็มกราฟ
- ความเชื่อเรื่อง "ออเดอร์ค้าง" พิสูจน์ไม่ได้ เทรดเดอร์รายย่อยมองไม่เห็นออเดอร์จริงในตลาด Forex ที่ไม่มีศูนย์กลาง โซนจึงเป็นการอนุมานจากรูปกราฟเท่านั้น
- โซนกว้างเกินไป ทำให้ SL ไกล ล็อตต้องเล็กลงมาก หรือคนตัดสินใจเพิ่มล็อตจนเสี่ยงเกิน
- ตั้ง Limit ทวนเทรนด์แรง โซนดีมานด์ในขาลงที่มีแรงขายต่อเนื่องมักถูกทะลุ
- ไม่เผื่อสเปรดและข่าว ออเดอร์อาจไม่ถูกเติมเพราะราคา Ask/Bid ไม่ถึง หรือถูกเติมแล้วโดน SL ทันทีเมื่อข่าวออก
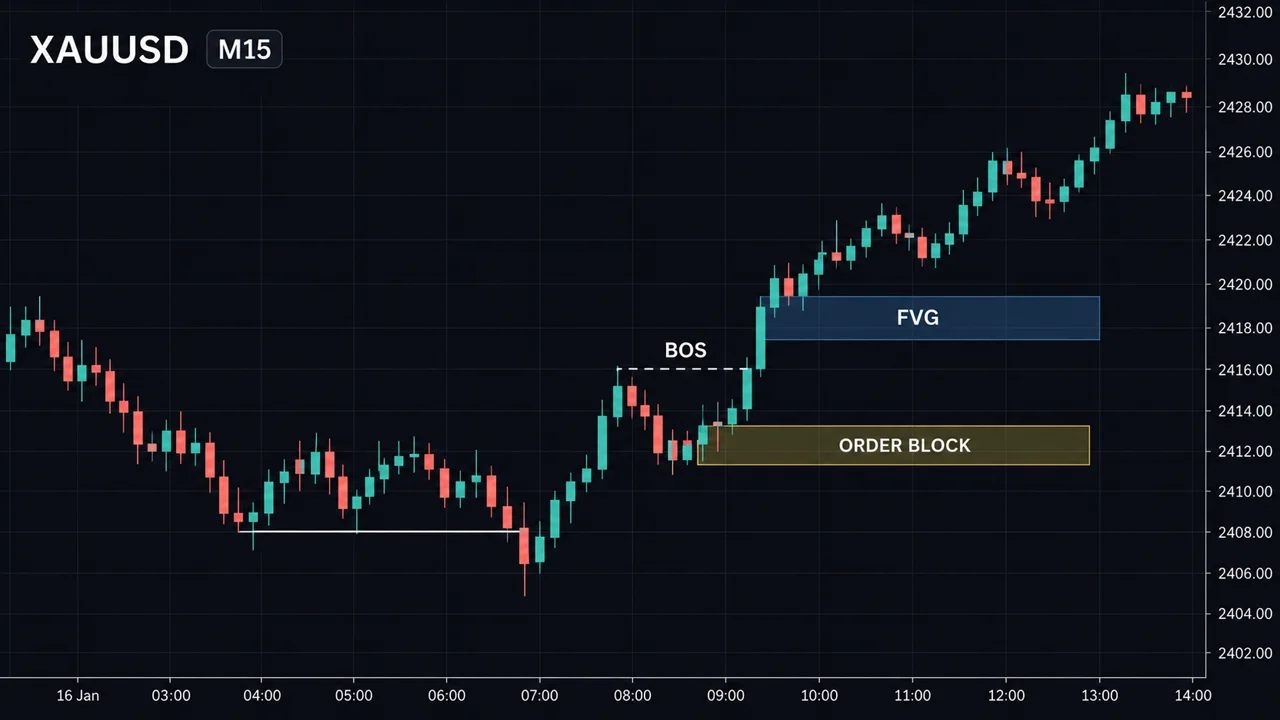
- แนวคิดนี้คล้ายกับ Order Block มาก ต่างกันที่ชื่อและรายละเอียดการวาด ไม่มีแนวไหนรับประกันผล
ใช้บนมือถือ
ออเดอร์รอเหมาะกับคนเทรดบนมือถือ เพราะไม่ต้องนั่งเฝ้าจอ บน MT4/MT5 มือถือ กดเปิดออเดอร์ใหม่ เลือกประเภท Buy Limit หรือ Sell Limit แล้วใส่ราคา SL และ TP ให้ครบตั้งแต่ตอนตั้ง อย่าตั้งแต่ราคาเข้าแล้วคิดว่าจะมาใส่ SL ทีหลัง และควรตั้งวันหมดอายุ (Expiration) ถ้าแอปรองรับ เพื่อไม่ให้ออเดอร์เก่าถูกเติมในวันที่บริบทเปลี่ยนไปแล้ว
สรุป
- ดีมานด์ = ฐานก่อนราคาวิ่งขึ้นแรง ซัพพลาย = ฐานก่อนราคาร่วงแรง
- วาดขอบโซนด้วยกฎเดิมทุกครั้ง และข้ามโซนที่กว้างเกินระยะ SL ที่รับได้
- คัดโซนด้วยแรงออกตัว ความสด BOS และทิศเทรนด์ใหญ่
- เลือกระหว่างออเดอร์รอ (RR ดี เข้าบ่อย) กับรอยืนยัน (คัดได้ พลาดบางรอบ)
- โซนเป็นการอนุมานจากกราฟ ไม่ใช่การมองเห็นออเดอร์จริง จัดการความเสี่ยงทุกไม้
Supply and demand zones build on support and resistance, but they focus on where price launched sharply rather than where price bounced many times. The idea is that when price leaves an area in a hurry, large buy or sell interest may have been there and not fully filled. When price comes back, any remaining interest may cause another reaction.
What supply and demand zones are
- Demand zone — a short pause followed by a strong rally. It is read as a place where buyers outnumbered sellers.
- Supply zone — a short pause followed by a strong drop. It is read as a place where sellers outnumbered buyers.
There are four common shapes, depending on what price did before and after the base:
| Pattern | Before base | After base | Type |
|---|---|---|---|
| Rally-Base-Rally | Up | Up | Demand (continuation) |
| Drop-Base-Rally | Down | Up | Demand (reversal) |
| Drop-Base-Drop | Down | Down | Supply (continuation) |
| Rally-Base-Drop | Up | Down | Supply (reversal) |
The "base" is one to four small candles where price paused before leaving.
Drawing zones systematically
- Find a long-bodied candle (the departure candle) that clearly moved price away from an area.
- Look at the small candles just before it. That is the base.
- For demand, the lower edge is the lowest point of the base (wicks included); the upper edge is the highest body in the base.
- For supply, reverse it: the upper edge is the base high, the lower edge is the lowest body in the base.
- If the zone is too wide compared with the stop you can accept, skip it or look for a tighter base on a lower timeframe.
Grading zone strength
Not every zone is worth trading. Common filters:
- Departure strength — the longer and faster the departure candle compared with normal candles, the more interesting the zone.
- Freshness — a zone price has never returned to carries more weight. Zones touched two or three times usually weaken.
- What it achieved — if the move out of the zone broke structure, the zone caused a real change.
- Higher-timeframe trend — a demand zone inside an H4 uptrend is more credible than one inside a downtrend.
- Time in the base — a short base (1–3 candles) is usually better than a long one that turned into a range.
A demand zone sitting at the HL of an uptrend, or a supply zone at the LH of a downtrend, is where several reasons line up. See market structure.
How to enter
Two main approaches:
- Pending order at the zone edge (set and forget). Place a buy limit at the top of a demand zone with the stop below the bottom. Good reward-to-risk and no screen time, but you get filled every time price touches, even when the zone is about to fail.
- Wait for confirmation. Wait for a reversal candle or a lower-timeframe structure shift inside the zone. This filters some failing zones but misses moves that touch and leave immediately. See entry triggers.
Suppose H4 shows a Drop-Base-Rally demand zone at 1.0750–1.0765, and the rally out of it broke structure. The account is $5,000 and you risk about 1%. Buy limit at 1.0767 (just above the top edge to allow for spread), stop at 1.0743 (7 pips below the bottom edge) = 24 pips. At 0.20 lot = $2/pip → risk 24 × $2 = $48 (0.96% of the account). A 3R target = 24 × 3 = 72 pips → 1.0767 + 0.0072 = 1.0839 → profit at target 72 × $2 = $144. Before setting it, check for a supply zone between 1.0767 and 1.0839. If there is one, bring the target in below it.
See the chart below: the same example drawn out.
Weaknesses and common mistakes
- Anything can be a zone. Almost every big candle has a base in front of it. Without filters your chart fills with zones.
- "Unfilled orders" cannot be verified. Retail traders can't see real orders in the decentralised forex market. Zones are an inference from chart shape only.
- Zones that are too wide push the stop far away, forcing a tiny lot, or tempting people to raise the lot and over-risk.
- Limit orders against a strong trend. Demand zones in a persistent downtrend often get run over.
- Ignoring spread and news. Your order may not fill because Bid/Ask never reached it, or it fills and stops out instantly on a release.
- This idea is very close to order blocks; the difference is mostly naming and drawing details. Neither guarantees an outcome.
On a phone
Pending orders suit phone traders because you don't have to watch the screen. In MT4/MT5 mobile, open a new order, choose Buy Limit or Sell Limit, and enter the stop loss and take profit when you place it. Don't set the entry now and plan to add the stop later. If your app supports an expiration time, use it so an old order doesn't fill on a day when the context has changed.
Summary
- Demand = the base before a sharp rally; supply = the base before a sharp drop.
- Draw zone edges with the same rule every time and skip zones wider than your acceptable stop.
- Filter by departure strength, freshness, structure break and higher-timeframe trend.
- Choose between pending orders (better R:R, more fills) and confirmation (filters, but misses some moves).
- Zones are inferred from the chart, not seen orders. Manage risk on every trade.