SMC และ Order Block (Smart Money Concepts)SMC and Order Blocks
เข้าใจแนวคิด Smart Money Concepts และ Order Block ว่าคืออะไร วาดอย่างไร ใช้วางจุดเข้าและ SL ยังไง และทำไมต้องมองมันเป็นการตีความ ไม่ใช่ความจริงแน่นอนLearn what Smart Money Concepts and order blocks are, how traders mark them, how they use them for entries and stops, and why they remain an interpretation rather than a proven edge.
ในบทความนี้ · 6
In this article · 6
Smart Money Concepts หรือ SMC เป็นสำนักวิเคราะห์ที่ได้รับความนิยมมากในหมู่เทรดเดอร์รายย่อยช่วงหลายปีที่ผ่านมา แนวคิดหลักคือ "เงินใหญ่" อย่างธนาคารและกองทุนทิ้งร่องรอยไว้บนกราฟ และถ้าเราอ่านร่องรอยนั้นออก ก็จะเทรดตามทางเดียวกับเขาได้ หนึ่งในเครื่องมือที่ถูกพูดถึงมากที่สุดของ SMC คือ Order Block (OB)
บทความนี้อธิบายแนวคิดอย่างตรงไปตรงมา วิธีที่คนใช้จริง ตัวอย่างตัวเลข และข้อจำกัดที่ควรรู้ก่อนเอาเงินจริงไปเสี่ยง
SMC คืออะไร
SMC ไม่ใช่อินดิเคเตอร์ แต่เป็นชุดคำศัพท์และวิธีมองกราฟที่ต่อยอดมาจาก Price Action และแนวคิดอุปสงค์อุปทาน (Supply and Demand) องค์ประกอบหลักมีประมาณนี้
- โครงสร้างตลาด (Market Structure) ดูยอดสูงยอดต่ำ (Higher High / Higher Low หรือ Lower High / Lower Low) เพื่อบอกเทรนด์
- BOS (Break of Structure) ราคาทะลุยอดเดิมในทิศทางเทรนด์ = เทรนด์ยังไปต่อ
- CHoCH (Change of Character) ราคาทะลุยอดสำคัญสวนทางเทรนด์ = สัญญาณแรกว่าเทรนด์อาจเปลี่ยน
- สภาพคล่อง (Liquidity) กลุ่มคำสั่ง Stop Loss ที่กองอยู่เหนือยอดหรือใต้ฐาน
- Order Block โซนราคาที่เชื่อว่ามีคำสั่งรายใหญ่ค้างอยู่
- Fair Value Gap (FVG) ช่องว่างราคาที่เกิดจากการวิ่งเร็วเกินไป
ข้อสังเกตคือ คำว่า "Smart Money" เป็นคำเล่าเรื่อง ไม่มีใครเห็นได้จริงว่าคำสั่งบนกราฟเป็นของใคร โดยเฉพาะในตลาด Forex ที่ไม่มีศูนย์กลาง เราเห็นแค่ราคาที่โบรกเกอร์ของเราแสดง
Order Block คืออะไร
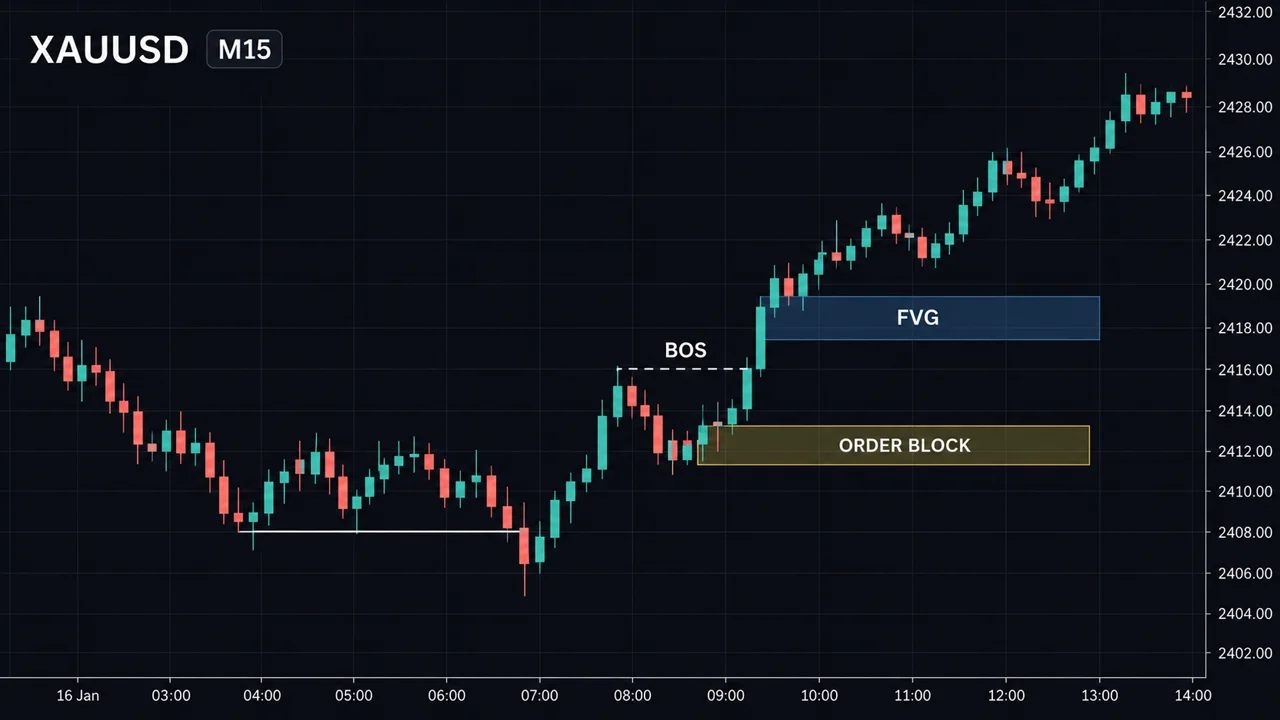
นิยามที่ใช้กันทั่วไปคือ แท่งเทียนสุดท้ายที่วิ่งสวนทาง ก่อนเกิดการวิ่งแรงจนทำลายโครงสร้าง (BOS)
- Bullish Order Block = แท่งแดง (ขาลง) แท่งสุดท้าย ก่อนราคาพุ่งขึ้นแรงจนทะลุยอดเดิม
- Bearish Order Block = แท่งเขียว (ขาขึ้น) แท่งสุดท้าย ก่อนราคาร่วงแรงจนทะลุฐานเดิม
ตรรกะที่ SMC เล่าคือ ผู้เล่นรายใหญ่ทยอยสะสมคำสั่งในโซนนั้น แต่ยังเติมไม่ครบ เมื่อราคากลับมาที่โซนเดิม (เรียกว่า Mitigation) คำสั่งที่ค้างอยู่จะดันราคาออกไปอีกรอบ
เกณฑ์ที่คนนิยมใช้กรอง OB
- ต้องมีการวิ่งแรง (Displacement) ออกจากโซน เห็นเป็นแท่งยาวหลายแท่งติดกัน
- การวิ่งนั้นต้องทำ BOS หรือ CHoCH ได้จริง
- มักทิ้ง FVG ไว้ระหว่างทาง
- ยังไม่เคยถูกราคากลับมาแตะ (Unmitigated) ยิ่งสดยิ่งถือว่ามีน้ำหนัก
- อยู่ฝั่งเดียวกับเทรนด์ของไทม์เฟรมใหญ่
วิธีวาดโซน
ส่วนใหญ่วาดจากราคาสูงสุดถึงต่ำสุดของแท่ง OB (รวมไส้) บางคนใช้แค่ตัวแท่ง (Body) เพื่อให้โซนแคบลง บางคนใช้ครึ่งแท่ง (Mean Threshold 50%) เป็นจุดเข้า ไม่มีวิธีไหนถูกต้องเพียงวิธีเดียว ตรงนี้เองที่ทำให้ผลลัพธ์ของแต่ละคนต่างกันมาก
วิธีใช้ OB วางแผนเทรด
ลำดับขั้นที่พบบ่อยในหมู่ผู้ใช้ SMC
- ดูไทม์เฟรมใหญ่ (เช่น H4) ว่าโครงสร้างเป็นขาขึ้นหรือขาลง
- หา OB ในทิศเดียวกับเทรนด์ที่ยังไม่ถูกแตะ
- รอราคากลับมาที่โซน อย่าไล่ราคา
- ลงไปดูไทม์เฟรมเล็ก (M15 หรือ M5) รอ CHoCH เล็ก ๆ ในโซนเพื่อยืนยัน
- วาง SL เลยขอบอีกฝั่งของ OB เล็กน้อย
- เป้าหมายแรกคือยอดหรือฐานล่าสุดที่เป็นแหล่งสภาพคล่อง
สมมติบน H1 ทองคำมีขาขึ้น และเกิด Bullish OB ที่ช่วง 1,948.00–1,951.00 ก่อนราคาพุ่งไปทำยอด 1,972.00 แผนคือตั้ง Buy Limit ที่ 1,951.00 (ขอบบน) SL ที่ 1,946.50 (ต่ำกว่าโซน 1.50 ดอลลาร์) เป้าหมาย 1,970.00 ระยะ SL = 1,951.00 − 1,946.50 = 4.50 ดอลลาร์ · ระยะ TP = 1,970.00 − 1,951.00 = 19.00 ดอลลาร์ อัตราส่วน Risk:Reward = 19.00 ÷ 4.50 ≈ 1 : 4.2 บัญชี 2,000 ดอลลาร์ ยอมเสีย 1% = 20 ดอลลาร์ · ทอง 0.01 ล็อต ขยับ 1 ดอลลาร์ = 0.01 × 100 = 1 ดอลลาร์ ล็อต = 20 ÷ (4.50 × 100) = 0.044 → ปัดลงเป็น 0.04 ล็อต (เสียจริงถ้าโดน SL = 4.50 × 4 = 18 ดอลลาร์) ถ้าถึงเป้า ได้ 19.00 × 4 = 76 ดอลลาร์ ก่อนหักสเปรดและค่าคอม
ดูภาพด้านล่าง
สังเกตว่า RR ดูสวยเพราะ SL แคบ แต่ SL แคบก็โดนกวาดง่ายเช่นกัน ตัวเลขนี้ไม่ได้บอกอัตราชนะเลย
จุดอ่อน / ข้อผิดพลาดที่พบบ่อย
- เป็นการตีความ ไม่ใช่ข้อเท็จจริง ไม่มีหลักฐานสาธารณะที่ยืนยันว่า OB ที่วาดจากแท่งเทียนตรงกับคำสั่งของสถาบันจริง เทรดเดอร์สองคนดูกราฟเดียวกันมักวาด OB ต่างกัน
- มองย้อนหลังง่าย มองล่วงหน้ายาก บนกราฟอดีต OB ที่ "ได้ผล" เด่นชัด แต่ OB ที่ถูกราคาทะลุทิ้งเรามักลืมไปเอง เป็นอคติจากการเลือกดู (Hindsight Bias)
- มี OB ทุกที่ ทุกการวิ่งแรงจะมีแท่งสวนก่อนหน้าเสมอ ถ้าไม่มีเกณฑ์กรองที่เขียนชัด จะเจอ OB จนเลือกไม่ถูก
- SL แคบโดนข่าวง่าย ช่วงข่าวแรง ทองคำวิ่งเกิน 5 ดอลลาร์ได้ในไม่กี่วินาที
- ศัพท์ใหม่ไม่ได้แปลว่าวิธีใหม่ OB โดยแก่นคือโซนอุปสงค์อุปทานแบบหนึ่ง ควรทดสอบเหมือนกลยุทธ์อื่น ๆ
- ไม่ได้ทดสอบ หลายคนเรียนจากคลิปแล้วเทรดเงินจริงทันที ควรเขียนกฎเป็นข้อ ๆ แล้วทดสอบย้อนหลังและบนบัญชีเดโมก่อน
"สถาบันทิ้งคำสั่งไว้ตรงนี้" เป็นคำอธิบายที่ฟังขึ้น แต่ฟังขึ้นไม่เท่ากับพิสูจน์แล้ว ตัดสินจากผลทดสอบของกฎที่เขียนชัดเท่านั้น
ใช้บนมือถือ
บน MT5 มือถือ ใช้เครื่องมือ Rectangle วาดโซนได้ แต่ปรับขอบให้ตรงไส้เทียนยาก แนะนำให้ซูมเข้าก่อนวาด และจดราคาขอบบนล่างไว้ในโน้ต ตั้ง Buy/Sell Limit พร้อม SL ไว้ล่วงหน้า แทนการนั่งเฝ้าจอ
สรุป
- SMC คือชุดคำศัพท์ต่อยอดจาก Price Action ไม่ใช่การเห็นคำสั่งของสถาบันจริง
- Order Block = แท่งสวนทางแท่งสุดท้ายก่อนการวิ่งแรงที่ทำลายโครงสร้าง
- ใช้คู่กับโครงสร้างตลาด ไทม์เฟรมใหญ่ และ SL ที่ชัดเจน
- วิธีวาดต่างกันทำให้ผลต่างกัน ต้องเขียนกฎให้ชัดแล้วทดสอบเอง
- มองเป็นเครื่องมือช่วยตัดสินใจ ไม่ใช่ความได้เปรียบที่พิสูจน์แล้ว
Smart Money Concepts (SMC) has become one of the most popular schools of chart reading among retail traders. Its core idea is that large players such as banks and funds leave footprints on the chart, and if you can read those footprints you can trade alongside them. The best-known SMC tool is the order block (OB).
This article explains the ideas plainly, shows how traders actually use them, works through an example with real arithmetic, and is honest about the limits before you put money behind it.
What SMC is
SMC is not an indicator. It is a vocabulary and a way of looking at price that grew out of classic price action and supply-and-demand trading. Its main building blocks are:
- Market structure — reading highs and lows (higher highs and higher lows, or lower highs and lower lows) to define the trend.
- BOS (Break of Structure) — price breaks a prior swing in the trend direction, so the trend continues.
- CHoCH (Change of Character) — price breaks an important swing against the trend, an early hint that the trend may be turning.
- Liquidity — clusters of stop-loss orders resting above highs and below lows.
- Order block — a price zone where large orders are believed to be resting.
- Fair Value Gap (FVG) — a gap left when price moves too quickly.
Note that "smart money" is a story, not an observation. Nobody can see whose orders are behind a candle, especially in spot forex, which has no central exchange. You only see the prices your broker shows you.
What an order block is
The common definition: the last opposite-colored candle before a strong move that breaks structure.
- Bullish order block — the last bearish (red) candle before price rallies hard and breaks a previous high.
- Bearish order block — the last bullish (green) candle before price drops hard and breaks a previous low.
The SMC explanation is that large players were building a position in that zone but did not fill it completely. When price returns to the zone (called mitigation), the leftover orders push price away again.
Filters traders commonly use
- A strong move (displacement) away from the zone — several long candles in a row.
- That move actually produces a BOS or CHoCH.
- It often leaves an FVG behind.
- The zone has not been revisited yet (unmitigated); fresher is considered stronger.
- It points in the same direction as the higher-timeframe trend.
Drawing the zone
Most traders mark the full high-to-low range of the OB candle, wicks included. Some use only the body to get a tighter zone. Others enter at the midpoint (the 50% "mean threshold"). There is no single correct method, and that alone is why two traders' results with "the same" strategy can differ so much.
Using order blocks to plan a trade
A typical SMC workflow:
- Check a higher timeframe (say H4) to decide whether structure is bullish or bearish.
- Find an unmitigated OB in the trend direction.
- Wait for price to come back to the zone; do not chase.
- Drop to a lower timeframe (M15 or M5) and wait for a small CHoCH inside the zone as confirmation.
- Place the stop just beyond the far edge of the OB.
- Target the nearest swing high or low that holds liquidity.
Suppose gold is trending up on H1 and a bullish OB forms at 1,948.00–1,951.00 before a rally to 1,972.00. Plan: Buy Limit at 1,951.00 (top of the zone), stop at 1,946.50 ($1.50 below the zone), target 1,970.00. Stop distance = 1,951.00 − 1,946.50 = $4.50 · target distance = 1,970.00 − 1,951.00 = $19.00. Risk:reward = 19.00 ÷ 4.50 ≈ 1 : 4.2. Account $2,000, risking 1% = $20. Gold at 0.01 lot: a $1 move = 0.01 × 100 = $1. Lot = 20 ÷ (4.50 × 100) = 0.044 → round down to 0.04 lot (actual loss if stopped = 4.50 × 4 = $18). If the target is hit: 19.00 × 4 = $76, before spread and commission.
See the chart below.
The reward-to-risk looks attractive because the stop is tight, but a tight stop is also easy to clip. None of these numbers tell you anything about the win rate.
Weaknesses and common mistakes
- It is interpretation, not fact. There is no public evidence that zones drawn from candles match real institutional orders. Two traders looking at the same chart often mark different OBs.
- Easy in hindsight, hard in real time. On old charts, the OBs that "worked" stand out, while the ones price sliced through are quietly forgotten. That is hindsight bias.
- Order blocks are everywhere. Every strong move has an opposite candle before it. Without written filters you will find too many zones to choose from.
- Tight stops and news do not mix. During major releases gold can move more than $5 in seconds.
- New words, old idea. At its core an OB is a type of supply/demand zone. Test it like any other strategy.
- Skipping testing. Many traders learn from videos and go live immediately. Write the rules down, then backtest and demo-test first.
"Institutions left orders here" is a plausible explanation. Plausible is not proven. Judge it only by the test results of clearly written rules.
On a phone
On MT5 mobile you can draw zones with the Rectangle tool, but snapping edges to wicks is fiddly. Zoom in before drawing, write the top and bottom prices in a note, and set your Buy/Sell Limit with the stop in advance instead of watching the screen.
Summary
- SMC is a vocabulary built on price action, not a window into institutional orders.
- An order block is the last opposite candle before a strong, structure-breaking move.
- Use it with market structure, a higher-timeframe bias and a clear stop.
- Different drawing methods give different results; write your rules and test them yourself.
- Treat it as a decision aid, not a proven edge.