Divergence ราคากับอินดิเคเตอร์ไม่ไปทางเดียวกันDivergence
แยก Regular กับ Hidden Divergence ให้ออก วิธีหาจุดเทียบที่ถูก เมื่อไหร่ควรรอสัญญาณยืนยัน และทำไมการสวนเทรนด์เพราะไดเวอร์เจนซ์อย่างเดียวถึงอันตรายTell regular from hidden divergence, compare the right swing points, know when to wait for confirmation, and see why fading a trend on divergence alone is dangerous.
ในบทความนี้ · 6
In this article · 6
ไดเวอร์เจนซ์ (Divergence) คือสถานการณ์ที่ราคากับอินดิเคเตอร์โมเมนตัม เช่น RSI หรือ MACD "เล่าเรื่องไม่ตรงกัน" ราคาทำจุดสูงใหม่ แต่อินดี้ไม่ทำตาม นี่เป็นหนึ่งในสัญญาณที่เทรดเดอร์ชอบมาก เพราะดูเหมือนเห็นการกลับตัวล่วงหน้า แต่ก็เป็นสัญญาณที่หลอกคนได้บ่อยมากเช่นกัน ถ้าใช้ผิดวิธี
Divergence คืออะไร
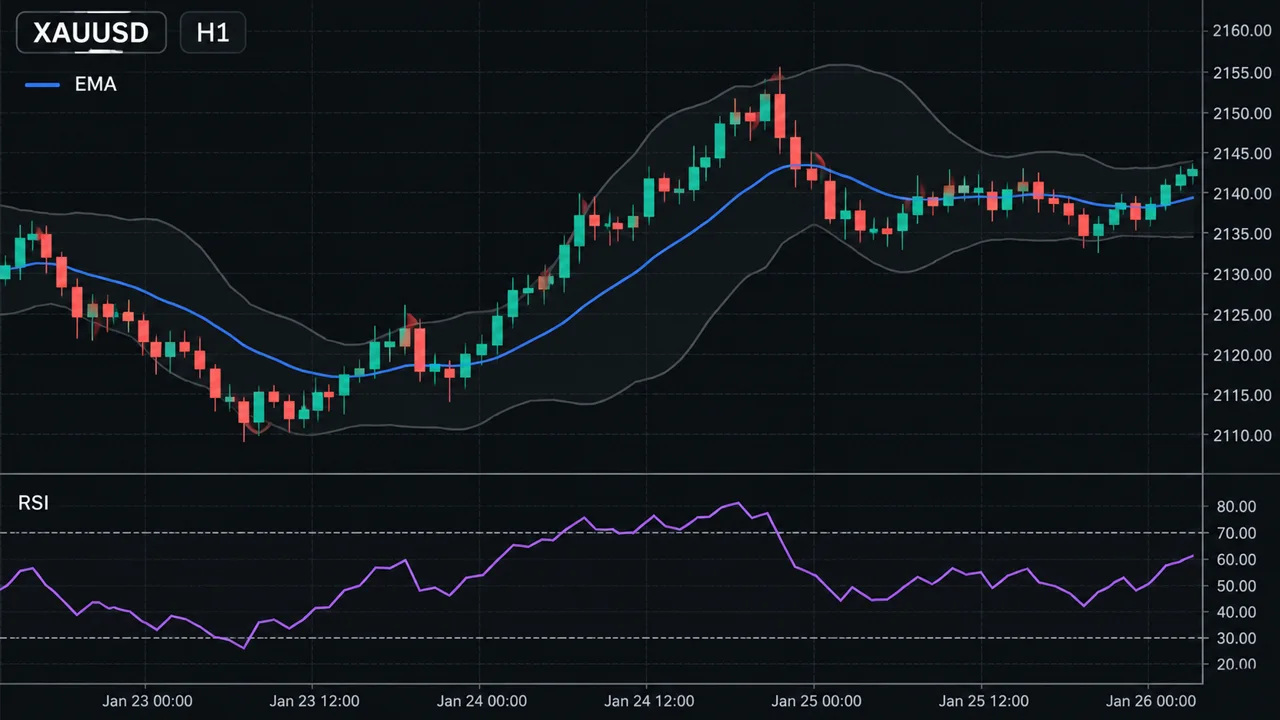
อินดี้โมเมนตัมวัด "ความเร็ว" ของการเคลื่อนที่ เมื่อราคาขึ้นไปทำจุดสูงใหม่ด้วยแรงที่น้อยลง อินดี้จะทำจุดสูงที่ต่ำกว่าเดิม ความไม่ตรงกันนี้บอกว่า โมเมนตัมกำลังอ่อนลง ไม่ได้บอกว่าราคาต้องกลับตัว ดูภาพด้านล่าง
ไดเวอร์เจนซ์มี 4 แบบหลัก:
| ชนิด | ราคา | อินดิเคเตอร์ |
|---|---|---|
| Regular ขาลง (Bearish) | High สูงขึ้น | High ต่ำลง |
| Regular ขาขึ้น (Bullish) | Low ต่ำลง | Low สูงขึ้น |
| Hidden ขาขึ้น | Low สูงขึ้น | Low ต่ำลง |
| Hidden ขาลง | High ต่ำลง | High สูงขึ้น |
- Regular = เตือนว่าเทรนด์เดิมอาจอ่อนแรง (ใช้มองหาการกลับตัว)
- Hidden = มักพบระหว่างการย่อในเทรนด์ ใช้มองหาการ "ไปต่อ" ของเทรนด์เดิม
วิธีหาไดเวอร์เจนซ์ให้ถูก
- เทียบ จุดสวิงกับจุดสวิง เท่านั้น — High กับ High, Low กับ Low ที่เห็นชัดบนกราฟ
- จุดบนอินดี้ต้องอยู่ ตรงแนวเดียวกับจุดบนราคา (แท่งเดียวกันหรือใกล้กันมาก)
- ใช้อินดี้ตัวเดียวที่ตั้งค่าคงที่ เช่น RSI 14 หรือ MACD 12,26,9 ดู RSI และ MACD
- ระยะห่างระหว่างสองจุดควรสมเหตุสมผล (เช่น 5–40 แท่ง) จุดที่ห่างกันหลายร้อยแท่งแทบไม่เกี่ยวกันแล้ว
- ไดเวอร์เจนซ์บนกรอบเวลาใหญ่มีน้ำหนักมากกว่ากรอบเล็ก
กฎเข้าออกแบบทั่วไป
ไดเวอร์เจนซ์เป็น "คำเตือน" ไม่ใช่ "คำสั่งเข้า" วิธีที่ระมัดระวังกว่าคือรอให้ราคายืนยันก่อน:
- พบ Regular Bearish Divergence ที่แนวต้านสำคัญ
- รอราคา เบรก Swing Low ล่าสุด (โครงสร้างเริ่มเปลี่ยน) ดู โครงสร้างตลาด
- เข้าขายหลังเบรก SL เหนือ High ล่าสุด
- เป้าที่แนวรับถัดไป หรือ 2 เท่าของความเสี่ยง
ทองทำ High ที่ 2,050 RSI = 72 จากนั้นทำ High ใหม่ที่ 2,060 แต่ RSI = 64 → ราคาสูงขึ้น อินดี้ต่ำลง = ไดเวอร์เจนซ์ขาลง ยังไม่ขาย รอราคาเบรก Swing Low ที่ 2,040 แล้วเข้าขายที่ 2,038 SL เหนือ High ล่าสุดที่ 2,062 = $24 ใช้ 0.01 ล็อต → ความเสี่ยง 24 × 0.01 × 100 = $24 เป้าแนวรับ 2,000 = $38 → ถ้าถึงได้ 38 × 0.01 × 100 = $38 บัญชี $1,500 ความเสี่ยง $24 = 1.6% ของพอร์ต (สูงกว่า 1% เพราะใช้ล็อตขั้นต่ำแล้ว ลดไม่ได้อีก)
จุดอ่อน / ข้อผิดพลาดที่พบบ่อย
- ไดเวอร์เจนซ์เกิดซ้ำได้หลายรอบ — ในเทรนด์แรง ราคาอาจทำไดเวอร์เจนซ์ 2–3 ชั้นแล้วยังไปต่อ คนที่ขายตั้งแต่ชั้นแรกจะโดน SL ทุกครั้ง
- มองย้อนหลังเห็นแต่ตัวที่สำเร็จ — ในภาพย้อนหลัง เราจำไดเวอร์เจนซ์ที่ราคากลับตัวได้ แต่ลืมอีกหลายครั้งที่ไม่เกิดอะไรขึ้น อย่าตัดสินจากตัวอย่างที่เลือกมา
- ลากเส้นผิดจุด — เทียบ High บนราคากับจุดบนอินดี้ที่ไม่ตรงกัน หรือเลือกจุดเล็ก ๆ ที่ไม่ใช่สวิงจริง ทำให้ "เห็น" ไดเวอร์เจนซ์ที่ไม่มีอยู่
- เปลี่ยนอินดี้จนกว่าจะเจอ — ถ้า RSI ไม่มี ไปดู MACD ไม่มีไปดู Stochastic สุดท้ายต้องเจอสักตัว นี่คือการหาเหตุผลสนับสนุนความคิดตัวเอง
- ไม่มีจุดยืนยัน — การเข้าสวนทันทีที่เห็นไดเวอร์เจนซ์ โดยไม่รอโครงสร้างราคาเปลี่ยน คือการเดาจุดกลับตัว
ไดเวอร์เจนซ์บอกว่าแรงลด ไม่ได้บอกว่าเมื่อไหร่ราคาจะกลับ ราคาอาจแค่ไซด์เวย์ให้โมเมนตัม "รีเซ็ต" แล้วไปต่อทางเดิม
ใช้บนมือถือ
บนจอเล็ก หมุนเป็นแนวนอน ซูมให้เห็นทั้งสองสวิง แล้วใช้เครื่องมือเส้นแนวโน้ม (Trendline) ลากเชื่อมจุดสูงบนราคาและบนอินดี้ จะเห็นทิศที่ต่างกันชัดขึ้น ตั้งแจ้งเตือนราคาไว้ที่ Swing Low/High ที่รอให้เบรก แทนการเฝ้าจอ ถ้าอยากดูว่าในอดีตสถานการณ์คล้ายกันราคาไปต่ออย่างไร ลองใช้ เครื่องมือวิเคราะห์ภาพกราฟ
สรุป
- ไดเวอร์เจนซ์ = ราคากับอินดี้โมเมนตัมทำสวิงคนละทาง บอกว่าโมเมนตัมอ่อนลง
- Regular ใช้มองหาการกลับตัว Hidden ใช้มองหาการไปต่อของเทรนด์
- เทียบสวิงกับสวิงที่ตรงกัน ใช้อินดี้ตัวเดียวค่าเดียว
- รอโครงสร้างราคายืนยันก่อนเข้า และวาง SL เหนือ/ใต้สวิงล่าสุด
- เกิดซ้ำได้หลายรอบในเทรนด์แรง อย่าใช้เป็นเหตุผลเดียวในการสวนเทรนด์
Divergence is when price and a momentum indicator such as RSI or MACD tell different stories: price makes a new high, but the indicator does not. Traders love it because it seems to reveal a reversal in advance. Used carelessly, it is also one of the most misleading signals there is.
How it works
Momentum indicators measure the speed of a move. When price pushes to a new high with less force, the indicator makes a lower high. That mismatch says momentum is weakening; it does not say price must reverse. See the chart below.
There are four main types:
| Type | Price | Indicator |
|---|---|---|
| Regular bearish | Higher high | Lower high |
| Regular bullish | Lower low | Higher low |
| Hidden bullish | Higher low | Lower low |
| Hidden bearish | Lower high | Higher high |
- Regular divergence warns that the existing trend may be tiring (used to look for reversals).
- Hidden divergence usually appears during pullbacks inside a trend and is used to look for continuation.
Spotting it correctly
- Compare swing to swing only — clear highs with highs, lows with lows.
- The indicator points must line up with the price points (same or nearly the same candle).
- Use one indicator with fixed settings, such as RSI 14 or MACD 12,26,9. See RSI and MACD.
- Keep the distance between the two swings reasonable (say 5–40 candles). Points hundreds of candles apart hardly relate.
- Divergence on a higher timeframe carries more weight than on a lower one.
Typical entry and exit rules
Divergence is a warning, not an entry order. A more careful approach waits for price to confirm:
- Spot a regular bearish divergence at a key resistance.
- Wait for price to break the latest swing low (structure starting to change). See Market structure.
- Sell after the break, stop above the latest high.
- Target the next support or 2× the risk.
Gold makes a high at 2,050 with RSI = 72, then a new high at 2,060 with RSI = 64. Higher price, lower indicator = bearish divergence. No sell yet. Wait for price to break the swing low at 2,040, then sell at 2,038. Stop above the latest high at 2,062 = $24. At 0.01 lot, risk = 24 × 0.01 × 100 = $24. Target support at 2,000 = $38 → 38 × 0.01 × 100 = $38 if reached. On a $1,500 account, $24 is 1.6% risk (above 1% because 0.01 is already the minimum lot).
Weaknesses and common mistakes
- Divergence can repeat — in a strong trend, price can print two or three layers of divergence and keep going. Selling the first one means getting stopped out each time.
- Hindsight shows only the winners — looking back, we remember divergences that led to reversals and forget the many that led nowhere. Do not judge from hand-picked examples.
- Wrong anchor points — comparing a price high with an indicator point that does not line up, or picking minor wiggles that are not real swings, makes you "see" divergence that is not there.
- Indicator shopping — no divergence on RSI, so check MACD, then Stochastic, until one shows it. That is searching for support for an opinion you already hold.
- No confirmation — fading the moment you spot divergence, without waiting for structure to change, is guessing the top.
Divergence says momentum is fading, not when price will turn. Price may simply range while momentum "resets", then continue in the original direction.
On a phone
On a small screen, rotate to landscape, zoom so both swings are visible, and use the trendline tool to connect the highs on price and on the indicator; the opposite slopes become much clearer. Set a price alert at the swing low or high you are waiting to see broken instead of watching the screen. To see how price behaved after similar situations in the past, try the chart analysis tool.
Summary
- Divergence = price and a momentum indicator make swings in different directions; momentum is fading.
- Regular divergence hints at reversal; hidden divergence hints at trend continuation.
- Compare matching swings, with one indicator on fixed settings.
- Wait for price structure to confirm, with a stop beyond the latest swing.
- It can repeat in strong trends; never make it your only reason to fight the trend.